Looking for How To Make Your Own Custom Mylar Bags, but not sure where to begin? This complete guide will take you through each step, from selecting durable materials to sealing the final product. With their durability, flexibility, and protective barrier, Mylar bags are perfect for keeping products safe and fresh. Ready to see what goes into making them? Let’s find out!

Understanding Mylar Material And Its Benefits
Mylar is a high-quality polyester film widely used in food-grade packaging, biodegradable materials, and edible wrappers because of its excellent strength, flexibility, and barrier properties. It protects products from moisture, oxygen, and light, which helps extend shelf life and maintain freshness. Mylar is lightweight yet durable, making it suitable for a wide range of products, including snack packaging, dessert packaging, sweets packaging, supplements, cosmetics, and other sensitive items. Using Mylar ensures that your products remain safe during storage, shipping, and display, while also providing a professional, refined appearance. Its versatility allows for custom printing, logo embossing, and additional design features, making it one of the most popular packaging materials available today.
Materials And Supplies Needed To Make Custom Mylar Bags
Creating custom Mylar bags requires essential Implements and sustainable materials to ensure quality results. You will need Mylar sheets or rolls, a reliable heat sealer for airtight closure, and cutting Implements to measure and shape the pouches accurately. Measuring equipment, such as rulers or scales, helps achieve consistent sizes, while optional items like zippers, spouts, or tear notches boost practicalality. Additionally, you’ll need printing or labeling Implements to add logos, designs, or product information. How To Make Your Own Custom Mylar Bags; having the right tools and materials ensures your bags are not only visually appealing but also durable and practical for everyday use. Find the perfect size and shape for your Mylar packaging today to ensure your products look professional while staying protected.
Choosing The Right Size And Shape For Your Bags
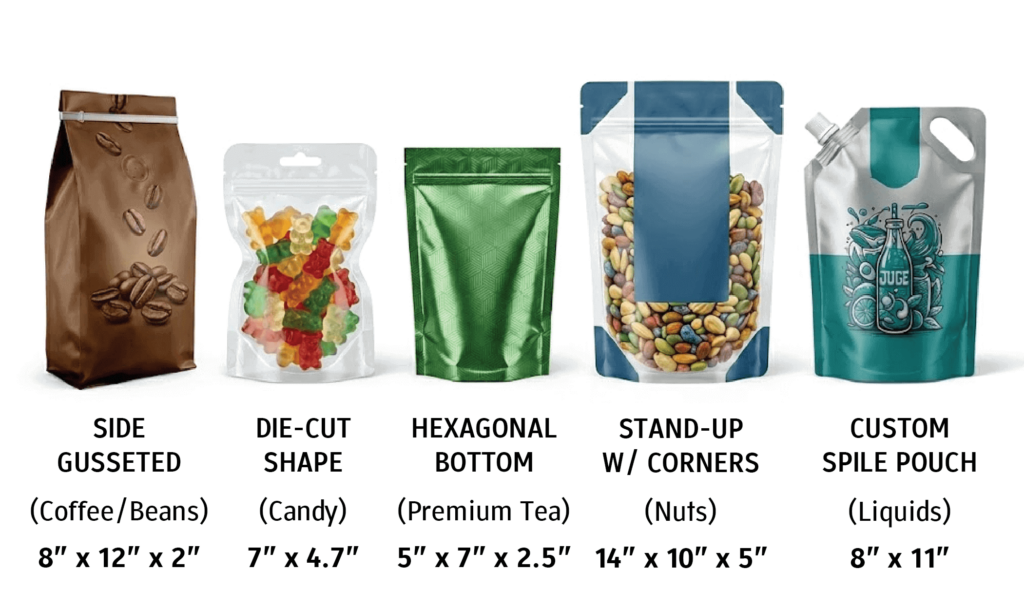
Selecting the appropriate size and shape for your Mylar bags is crucial for product protection, proper presentation, and freshness preservation. The bag should comfortably fit the product without leaving excessive space or risking overfilling. Depending on your needs, you can choose from stand-up pouches, flat pouches, gusseted bags, pillow pouches, or even edible pouches and custom die-cut shapes. Considering storage, shipping, and display requirements will help you choose the most suitable format. The right size and shape also contribute to better shelf appeal, improved brand visibility, and efficient use of materials, which can reduce overall production costs and boost customer satisfaction.
Get Extra Information At A Glance
| Feature / Bag Type | Stand-Up Pouch | Flat Pouch | Gusseted Bag | Pillow Pouch | Edible/Compostable Bag |
| Thickness | 3–5 mil | 3–5 mil | 3–5 mil | 3–5 mil | 2–4 mil |
| Best For | Snacks, supplements | Small items, candies | Bulkier products | Dry foods, powders | Edible treats, eco-friendly products |
| Structure | Self-standing | Flat | Expandable sides | Simple fold | Flexible, biodegradable |
| Sealing | Heat seal / zip | Heat seal | Heat seal/zip | Heat seal | Heat seal or twist |
| Branding Options | Printing, labels | Labels only | Printing, labels | Printing, labels | Printing, labels |
Step-By-Step Process To Make Your Own Custom Mylar Bags
Making Custom Mylar Bags involves selecting the right materials, shaping and sealing the pouch, adding branding elements, and ensuring quality. The sections below provide a detailed, step-by-step guide to each stage of the process.
Choosing the Right Mylar Material
The first step in how to make your own custom mylar bags is selecting the right material. The thickness of the Mylar determines durability and protection. For lightweight items such as snacks, small accessories, or clothing, a 3 mil Mylar film is sufficient. For heavier products or long-term storage, a thicker 5 mil film provides extra strength. You can also choose the finish; glossy for a professional look or matte for a softer appearance. For food packaging, always ensure the Mylar is food-safe.
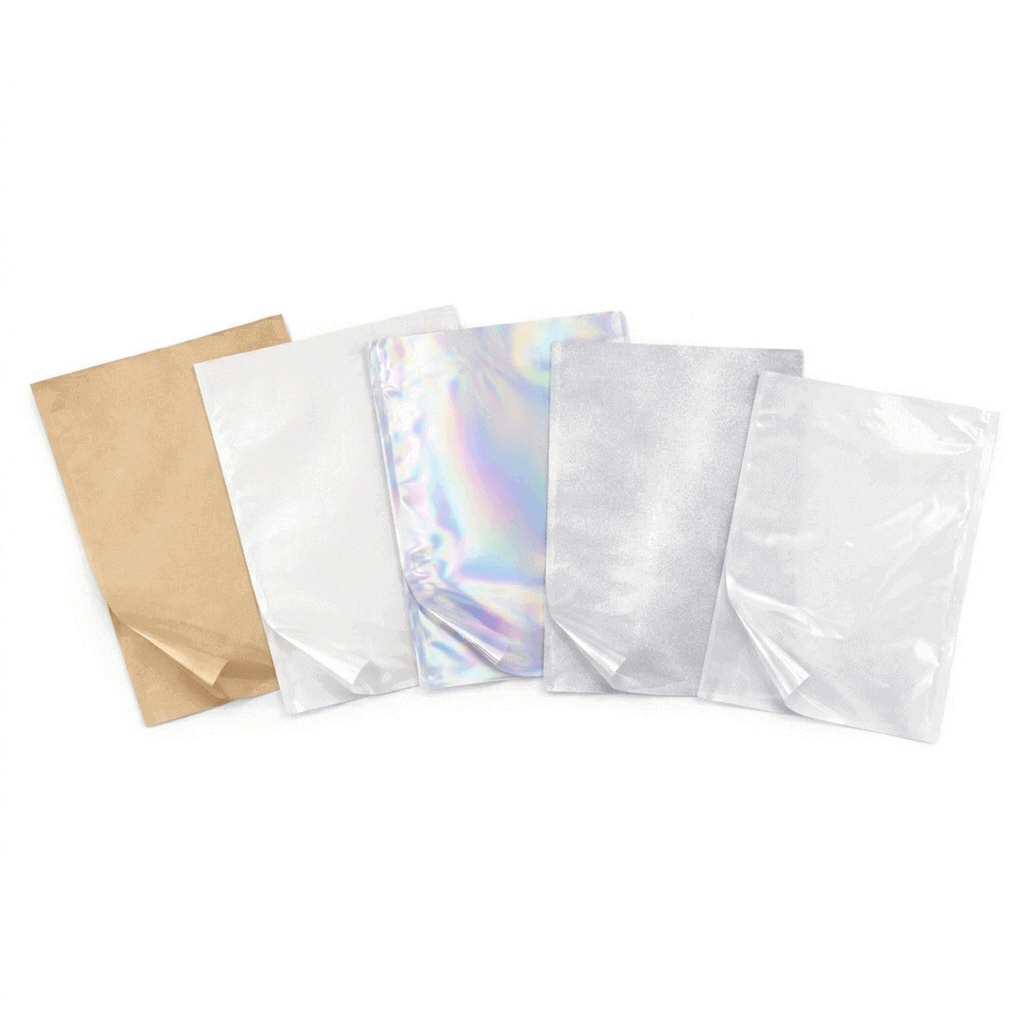
Additionally, consider colors, patterns, and high-resolution graphics to boost your brand aesthetic appeal. Choosing the right material upfront not only ensures food safety but also impacts the overall look and feel of your packaging.
Precise Cutting of Mylar Sheets
Once you’ve selected the material, the next step is cutting it to the desired size. Measure carefully using a ruler or measuring tape to ensure accuracy. A sharp pair of scissors works for small batches, but a rotary cutter is preferable for multiple pieces, providing clean, straight cuts. Leave extra material at the top for sealing, avoiding wastage and ensuring a strong closure later. Accurate cutting is crucial, as uneven edges can affect the sealing process and the final appearance of your bags. Using protein-based coatings, starch-based films, or polysaccharides can also improve durability for certain foods or edible products.

Folding and Shaping the Bag
After cutting, fold the Mylar to create the desired bag shape. For simple pouches, fold in half and align the edges. For more structured bags, fold the sides and bottom to create a stable form. Even, neat folds are crucial for professional-looking bags and a secure seal. Using a ruler can help maintain straight edges. Ensure enough material is left at the top for sealing. Proper folding ensures that the bag maintains its structure and looks refined, giving your packaging a professional finish; explore Custom Packaging Solutions to achieve the perfect result.
Adding Branding and Custom Design

Once sealed, it’s time to add Brand messaging. You can print directly onto the Mylar using a high-quality printer or apply custom stickers or labels. Direct printing provides a clean, professional look, ideal for large batches, while stickers or labels are perfect for smaller runs. Make sure branding does not cover the sealing area, preserving the bag practicalality. Well-branded bags not only protect products but also boost visual appeal and reinforce brand identity. Thoughtful branding helps your product stand out on shelves, improves customer experience, and builds trust with buyers.
“Packaging is a bridge between the brand and the consumer.” — Walter Landor
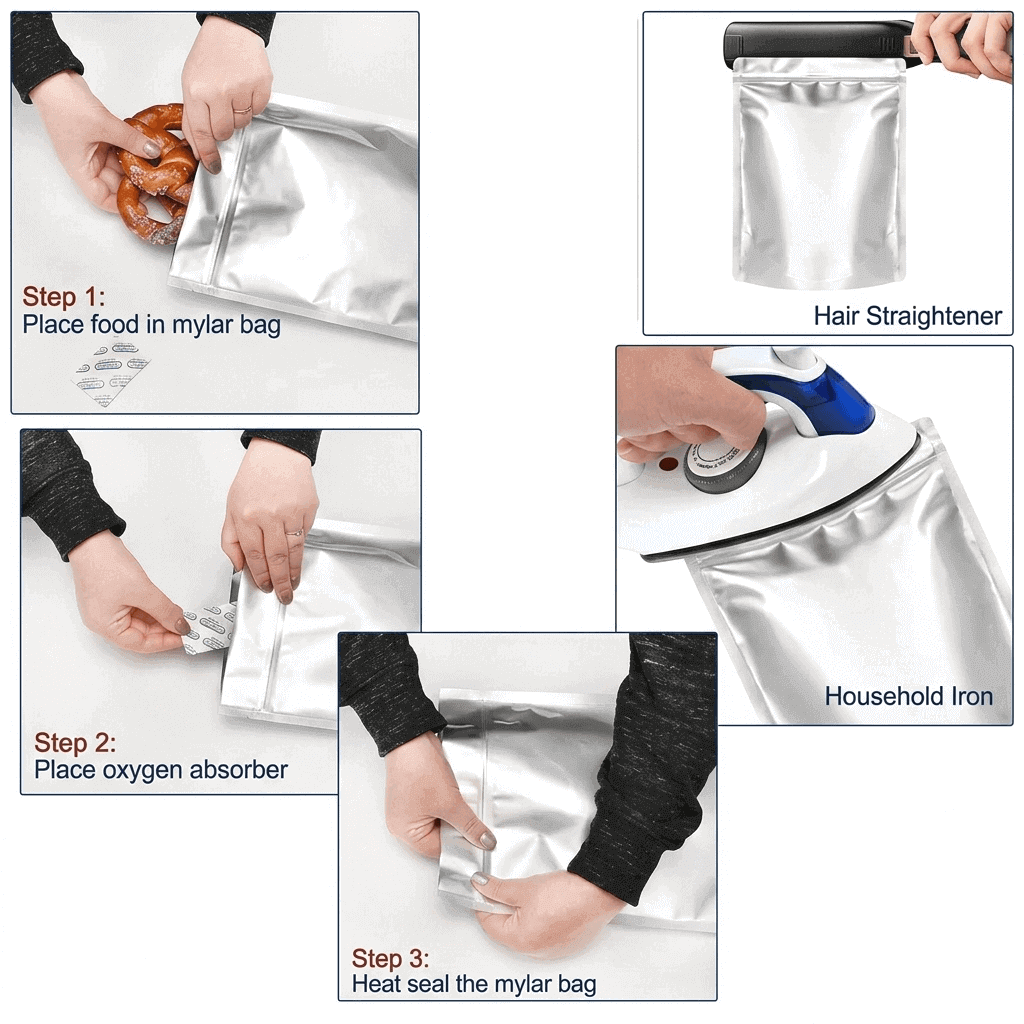
Heat Sealing for Airtight Closure
Sealing is critical to ensure the bag is airtight and durable. Use a heat sealer to bond the edges, melting the Mylar slightly to create a strong closure. Test the sealer on a scrap piece first; too much heat can damage the material, while too little may result in weak seals. Check for any gaps or weak spots to prevent leaks and ensure the bag maintains its shape and practicality. A good seal is essential not only for product protection but also for maintaining freshness and preventing contamination. Using moisture-resistant packaging and implementing measures ensures FDA compliance with safety standards.
Quality Testing and Durability Checks
The final step is testing the bags for durability and practicality. Check sealed edges for weak spots and ensure the bag is airtight. Gently squeeze the bag or fill it with the actual product to confirm strength and shape. Testing helps identify any issues with sealing, material choice, or bag structure, allowing adjustments before full production. Proper testing ensures reliable, professional-quality custom Mylar bags. Investing time in quality checks prevents returns and customer complaints, ensuring a professional standard for your environmentally friendly packaging.
If creating custom Mylar bags seems time-consuming or challenging, you can turn to a reliable service like Printing Shell. They provide a wide range of sizes and customizable options, making it easy to get professional-quality packaging without the hassle.
Production Tips For Beginners
For beginners, starting with small production runs and simple designs can help manage costs effectively. Using standard bag sizes, digital printing for low-volume orders, and testing samples before full production reduces material waste and avoids unnecessary expenses. Purchasing materials in bulk and planning production steps carefully also saves time and money. Taking a systematic approach to cost management ensures that even small businesses or startups can produce high-quality, sustainable custom Mylar bags without overspending. If you’re new to custom Mylar bags and unsure where to start, reach out to their experts today to simplify your packaging process! Reach out to their experts today to simplify your packaging process!
Common Mistakes to Avoid When Making Mylar Bags
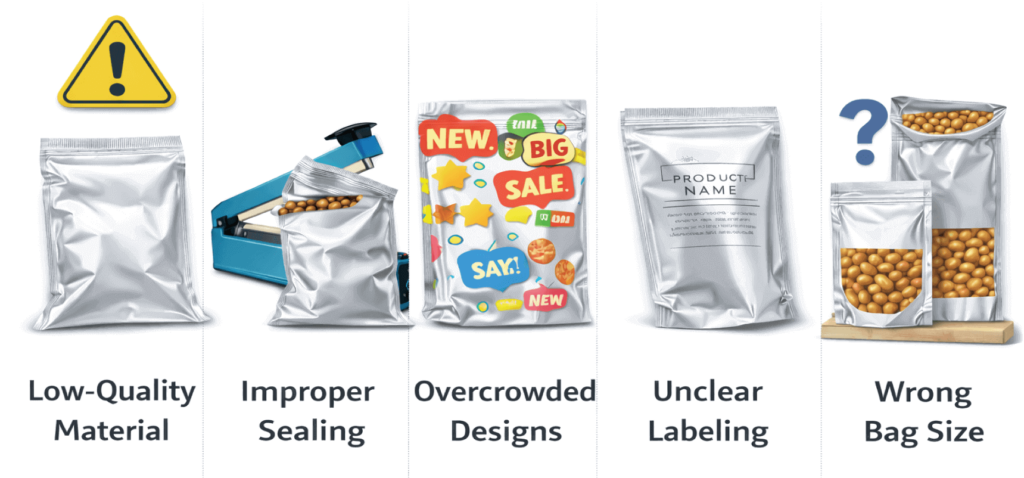
Several common mistakes can affect the quality and effectiveness of how to make your own custom Mylar bags. Using low-quality materials can compromise durability, while improper sealing can lead to leaks and product spoilage. Overcrowded designs or unclear labeling can confuse customers, and selecting the wrong bag size can make storage and display difficult. Ignoring compliance and safety standards may also create legal issues. Avoid common packaging mistakes and ensure professional, reliable results; see how Custom Mylar Bags UK. can help you achieve flawless custom packaging
Benefits of Making Your Own Custom Mylar Bags
- Full Portion control: Customize design, size, quality, and practical with Wafer paper wrappers or compostable films.
- Cost Reduction: Producing custom bags helps businesses save on long-term packaging costs.
- Brand Reflection: Custom bags allow businesses to create packaging that reflects brand identity.
- Product Protection: Mylar bags provide dessert packaging and food-grade packaging protection.
- Shelf Appeal: Custom designs boost the aesthetic appeal of products on shelves.
- Customer Satisfaction: High-quality packaging increases customer experience and loyalty.
- Design Flexibility: Test new designs using protein-based coatings, pectin films, or Recyclable films or seaweed-based films.
- Adaptability: Mylar bags can be adjusted for seasonal or Nutritional products packaging.
“Packaging can be theater, it can create a story.” — Malcolm Gladwell
Conclusion
In this article, we’ve provided a comprehensive guide on how to make your own custom Mylar bags, covering everything from selecting the ideal materials to ensure product freshness and durability, to choosing the right sizes and formats for optimal presentation and storage. Whether you’re a beginner or looking to improve your packaging, this guide provides the foundational knowledge you need to make your own Mylar bags. Having read through this article, you’re likely wondering How To Customize Your Mylar bags. Our comprehensive step-by-step guide covers everything you need to know! Click here to explore how you can transform your Mylar bags into fully customized packaging solutions.
Frequently Asked Questions (FAQs)
Why should I make my own custom Mylar bags instead of buying ready-made ones?
How to make your own custom Mylar bags gives you complete control over size, design, and material quality according to your product needs. It also helps reduce long-term costs with Zero-waste packaging costs and allows you to create unique branding that stands out in the market.
Can beginners really create professional-looking Mylar bags at home?
Yes, beginners can achieve professional results by using basic Implements and following proper cutting and sealing steps. With practice and attention to detail, clean and durable Mylar bags can be made easily at home.
How can I test whether my Mylar bags are strong enough?
Fill the bag with product and gently press it to check for air leaks or weak sealing points. You can also inspect the edges closely to ensure the seal is even and secure.
What problems can occur if the bag is not sealed properly?
Poor sealing allows air and moisture to enter the bag, which can damage the product and reduce shelf life. It may also lead to leaks, contamination, and customer dissatisfaction.
Could custom Mylar bags really improve customer trust?
High-quality and well-branded packaging makes products look professional and reliable. This builds customer confidence and increases the chances of repeat purchases and brand loyalty.
Which printing method is better for small production runs?
For small batches, labels and stickers are more cost-effective and flexible than direct printing. They allow easy design changes without wasting material or increasing production expenses.